How to Measure for a Dangler Replacement: A Visual Field Guide
Why This Article Exists
Cable length is the single most common source of dangler quote rework. Customers measure to the wrong reference point, include the tip in their length, or measure with the cable stretched — and the spec has to be reworked before a drawing can be produced. The 60-second field procedure below resolves that with one inspection, and avoids the back-and-forth that adds time to every order.
The Six Variables That Define a Dangler
An Eagle dangler is fully specified by six measurements. Get all six on the first request and the quote process moves at full speed. Miss any of them and the quote stalls until they're collected.
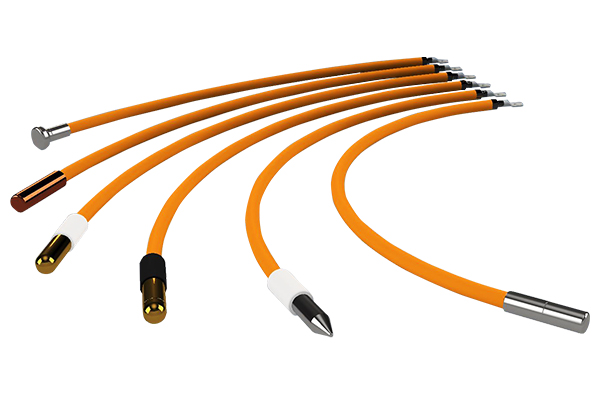
Cable length (Dimension A) — the most error-prone measurement. Cable cross-section — 50mm², 70mm², 120mm², or 185mm² depending on amperage. Lug bolt-hole diameter (Dimension D) — M10, M12, or M16 for nearly every plating bus bar in North America. Sheath material — PVC for standard zinc, PUR for higher amperage and longer life. Tip material — mild steel, stainless, brass, 38CZ premium brass, or copper. Tip style — fixed (welded to cable) or removable (screw-in, replaceable).
Cable Length: Where to Measure From
The cable length on every Eagle dangler drawing — labeled "A" — is measured from the center of the lug bolt hole at the bus bar end to the end of the cable insulation at the tip end. It does not include the tip itself. The tip dimensions (B and C) are added separately based on the tip material you choose.
This convention matters because if you measure from the edge of the lug instead of the center of the bolt hole, you'll be off by 6–13mm depending on lug size. That seems like nothing until you realize that danglers are typically specified to within 2mm of target length to ensure consistent reach to the part below the bus bar. A 13mm error is enough to require a redesign.
Cable Length: Where to Measure To
This is where most measurement errors happen. The cable length stops at the end of the cable insulation, just before the tip is installed. If you have an existing dangler in front of you and you measure to the end of the tip, you've added between 50mm and 90mm depending on tip family.
The simplest way to take this measurement correctly is with the dangler removed from service: lay it flat on a workbench, hold a tape at the center of the lug bolt hole, and read the value at the point where the orange cable insulation ends and the metal tip ferrule begins. Most plating shops record this in millimeters because Eagle's drawings are in metric, but you can submit inches and we'll convert.
If the dangler is still installed in the bath, take the measurement with it hanging in working position — not stretched out. The cable will sag a few millimeters under its own weight when hanging, and that's the operating condition we're matching.
The Three Most Common Measurement Errors
Error 1: Including the tip in the cable length. A dangler that's installed in a working bath is one piece — cable plus tip. When customers measure overall length, they include the tip. The replacement that arrives is then 60–90mm too long because we added a tip dimension on top of an already-tip-inclusive measurement. Always measure to the end of the cable insulation, not the end of the metal tip.
Error 2: Measuring with the cable taut. Some operators pull the cable straight with one hand while measuring with the other. The cable stretches under that load. Lay it flat or measure it in working hanging position — never stretched.
Error 3: Using a flexible tape over a curved path. If the existing dangler is bent or coiled, a flexible tape can take the long route instead of the straight-line distance. Use a rigid measure or pull the cable into a straight line on a flat surface before measuring.
Lug Bolt Hole — How to Identify the Right Size
The lug at the bus bar end of every dangler has a single bolt hole, and that hole has to match the bolt that secures it to the bus bar. In North American plating shops, the three sizes you'll see are M10 (10mm), M12 (12mm), and M16 (16mm). M12 is by far the most common — roughly 70% of all Eagle danglers shipped to North America use M12. M10 appears mostly on smaller barrel lines under 50A per dangler. M16 is reserved for heavy zinc-nickel and chrome lines running 200A or more per dangler.
To identify your size without calipers: pull a bolt out of an existing dangler position and check the head with a wrench. M10 takes a 17mm wrench (or 11/16" imperial). M12 takes a 19mm wrench (or 3/4" imperial). M16 takes a 24mm wrench (or 15/16" imperial). If you have mixed bus bars on different lines, measure each independently — they don't have to match across lines.
Verifying Tip Material and Style
Tip material matters because it has to be compatible with your bath chemistry. Mild steel works for nearly all acid zinc lines and is the default. Stainless adds chemical resistance for fluoborate baths or high-temperature operation. Brass (CZ) and 38CZ are used in copper plating, brass plating, and some zinc-nickel applications. Copper tips are used in high-conductivity applications where every milliohm matters.
If you're matching an existing dangler and you don't know what material it has, take a magnet to the tip. Steel and 38CZ are magnetic. Stainless and brass are not. Copper has a distinctive reddish color through any oxidation. If the tip is screw-in (removable), unthread it and look at the manufacturer's stamping on the cable end — Eagle marks tip material on every removable assembly.
The 60-Second Field Inspection
If you can spare 60 seconds at one dangler, here is the complete procedure to capture everything Eagle needs to quote a replacement:
1. Pull the existing dangler out of the bath and lay it flat. 2. Read the cable length from the center of the lug bolt hole to the end of the cable insulation, in millimeters. 3. Note the cable cross-section if labeled (50mm², 70mm², 120mm², 185mm²) — Eagle prints this on the cable jacket. If unlabeled, measure cable outer diameter: 24.0mm = PVC 50/70, 28.5mm = PUR 120, 30.5mm = PUR 185. 4. Measure the lug bolt hole or check the wrench size on the bus bar bolt to determine M10/M12/M16. 5. Check the tip — fixed or screw-in. Test with a magnet for material identification. 6. Take three photos: full length on a flat surface, lug detail, and tip detail.
When to Send Photos Instead
If any of the six variables are unclear after the field inspection — or if the dangler is from a non-Eagle manufacturer with non-standard dimensions — send photos and let our team identify the spec for you. The three photos that resolve nearly every question are: (1) the full dangler laid flat next to a tape measure or ruler, (2) a close-up of the lug end showing the bolt hole, and (3) a close-up of the tip end showing the tip-to-cable junction.
Submitting these three photos along with a partial spec is consistently faster than trying to reverse-engineer the right measurement on the floor under time pressure. Our team can usually identify a dangler from photos in under 10 minutes.
Ready to spec a replacement? Send the six variables above (cable length, cross-section, lug bolt-hole, sheath, tip material, tip style) plus the three photos described — through the contact page or to info@levelupplatingsupply.com. The more complete the first message, the faster the quote.
Request a Dangler Quote →